Learning objectives: 1.3
So, some overdue class notes from week 6 and 7:
EDITING USING THE SHARPENING TOOL:
RADIUS refers to how far you want the sharpening effect to extend from the contrast point. Stick to 1 – maximum 1.5
MASKING allows you to decrease sharpening from 100% of the image to just the contrast lines. To see how much masking to add, press the ALT button down continuously as you hold down and move the masking control. This will transform the image to black and white and show exactly how much of the image the masking is extending to. All white and your masking will extend across the entire image – but move the control to the right and the masking reduces until, eventually just the strongest contrast lines will be affected. You can see in the photos below how the level of masking decreases as you move the control from left to right, allowing you to select the masking level you’re after.


NOISE REDUCTION reducing noise on an image will also soften it, so, like most things in photography, it’s a give and take relationship. Losing sharpness – or, alternatively, over-sharpening – can hold back the viewer.
Use the preview tab in Bridge (or the little magnifying glass in Camera Raw) to magnify the image to see just how sharp it is.
R/G/B dots on your shots show an ISO issue (the technical term is moiré). Use the colour button and drag until the moiré disappears.
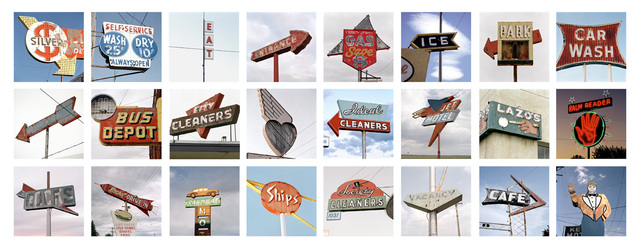
TYPOLOGY
The art of comparison of type, Typology refers to a genre of photography where a collection of images that share a uniform subject/style are displayed as one unit. Think of a large sheet of stamps – or a contact sheet – and you’ll get the picture. Renowned exponents include the portrait photographer: August Sander, and the conceptual artists: Bernd & Hilla Becher.

The subject of a typological study can be anything: people; cars; gas works; crisp packets: but the visual uniformity and overall aesthetic of the collective image should be greater than the sum of its parts. For current practitioners, look to the San Franciscan, Jeff Brouws‘ transformation of the often-overlooked and mundane.
Apparently, you can use Lightroom to save pics in a typological-style grid. Go to print; select, for example, 16 prints; then grid; then 4×4. Then, in bottom right, select print to jpeg file. Apparently. However, as I’ve only just installed Lightroom and, ten minutes in, still can’t find the buttons our tutor’s on about, I’ll have to get back to you on that.
Likewise, Bridge 2018 can do contact sheets. Just click on the Output tab on the top right strip; choose your output setting and drag the photos you want into it. Just make sure your shots are the same size if you want an end result that’s typographical versus shambolic. Then save as Jpeg.
FILMING FIREWORKS UPDATE: Here’s a belated tip for taking better pics of fireworks than I did a few weeks back. As it is flipping impossible to know where the firework will go off, manually focus to infinity by first bringing the focus in as tight as possible and then turning the focus ring as far as you can in the opposite direction. Combine with a high aperture and you’ll increase your chances of a sharp shot.
MOVING PEOPLE/STATIC BACKGROUND: Another belated tip based on last week’s attempt at conveying movement in the cafe I’ve been shooting in. Look for people wearing outfits of contrasting colour to that of the background if you want your moving image to stand out. Shutter speed of around 1/2 to 1 second should do it.
FLASH UPDATE: So, we’ve started to play around with flash in class. I don’t have many notes as we were faffing around too much to make them. But here’s a couple of quick rambling reminders for me and anyone else who’s looking.
Use flash in daytime to soften shadows; enhance colours and for macro photography.
Camera MUST be on manual setting: no point using any other setting as you won’t have adequate control.
HSS: Today’s all-singing, all-dancing flashes have freed us from the constrictions of old. You can do pretty much whatever you want now as long as you have an HSS (High Speed Sync) Flash and a camera that allows for HSS. HSS means you can use any aperture and/or any shutter speed and the flash will sync with it seamlessly (Flash Sync Speed = FSS). Even if your camera is rubbish, get an HSS Flash. There’s no point getting anything else; you can always hire a camera. The trigger/receiver set up (sorry, I can’t use that whole slave and master terminology; just sounds too freaking kinky) makes setting up new flashes using wireless communication really simple and foolproof (whereas infrared controlled ones will stop working in high light). I say foolproof but I still don’t have a clue what I’m doing. I need more course notes, God dammit.
Using flash, you can freeze movement using a faster shutter speed and higher aperture than would otherwise be possible in a low-light situation. But here’s the thing: you can also freeze motion in low-light settings using a lower shutter speed, too. Using a lower shutter speed (without flash) to photograph a moving image will invariably give you a static background that is in focus but total motion blur for anything that isn’t standing stock still. But by using a flash in slow-sync mode, you can capture the foreground and background nicely (because of that long exposure making full use of the ambient light) while the flash will work to freeze the element that is moving during the exposure and would otherwise either not register or just show up as an unholy mess. That split second of flash during the longer exposure is the split second that your camera captures (and correctly exposes) the subject and foreground. Which is pretty fricking amazing. If you’re still a bit confused (and, frankly, I don’t blame you if you are as I’m still getting my head around the whole concept), have a nose at this infinitely clearer explanation on exposureguide.com.
ETTL: stands for Electronic Through The Lens
REFLECTORS: useful for adding light OR shade both in natural or flash light. Buy reversible ones. Black/silver; White/gold. Gold adds warmth but is best used on people with darker skins, as it will add a beautiful glow (versus making someone as Vitamin D deficient as me look jaundiced). White will soften shadows. Silver is like adding another lightbulb. You can also use the opaque frame as a reflector or a diffuser with flash.
POSTCODE GALLERY CONTINUED:
Finally, some pics from this week. It was a truly, I mean TRULY, glorious misty, frosty dawn. And, somehow, I managed to take a bunch of truly, and I mean TRULY, sub-par shots that did not reflect what I was seeing (and certainly did not come close to ones I’ve shot on my iPhone in the past). So I did what any hardened cheat would do and turned them into black and white to see if that made one iota of difference. The look I was aiming for in the edit was moody, misty, ethereal and slightly spooky. Not sure I managed that, but they’re better than the colour versions.


And, yes, some of them are a tad typographical, as in same same but different. Sort of.


1.3
LikeLiked by 1 person