RAMBLING, RANDOM NOTES TO HELP ME REMEMBER STUFF
Classes 1 and 2 were a mixture of revisiting Level 1 STUFF to remind ourselves of what we’d already learned (and already started to forget) along with some new, techy STUFF that is still warping my mind. So don’t expect any flow to any of this. It’s just my notes to help me remember STUFF. Sometimes.
BE PREPARED (Sounds simple, easy to forget.)
Camera
Spare Battery
Memory Card
Cleaning Cloth
Think about what you need for each job: specific lenses; accessories/tripod/flash/remote control/filters (ND; Polarised; Graduated)
Note to self: Buy a 77mm lens cap
And remember, whatever you do, don’t end up the top of a mountain without the locking key for your tripod (mentioning for a friend).
COMPOSITION KEY ELEMENTS
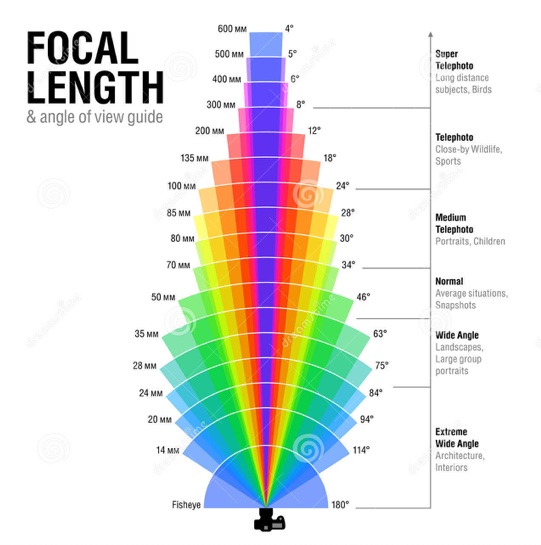
Think focal length; depth of field and distance to subject.
EXPOSURE/SHUTTER SPEED
Use Manual or Aperture Priority (AV on Canon). Latter useful if shooting on the fly and light levels changing rapidly.
Your aperture setting determines the shutter speed range so set it according to your SS needs or depth of field.
With AV, the camera chooses shutter speed – with Manual use light meter to select SS accordingly. If SS not fast enough, increase ISO (low light = more ISO).
If you want fast SS and quickly, use AV. Set aperture low and it will give you the fastest SS you can have for the actual light conditions.
If you are shooting a moving object and you want to capture a sharp image (versus a blur to depict movement) go for low aperture (4/5.6 good starting point).
You can also do all the above with Manual, but you just need to sort out the light metering first. AV speeds the process up if time is against you.
FOCUSING
For auto-focus, use focal lock – where you hold the focal button down to set focus and then take the shot. In my case, I use the central, singular focal point option, half-press the shutter button to lock focus on the area I want and then, keeping the shutter button half pressed, move to compose the shot how I want before taking the shot. This works well with my 15-88mm lens as the shutter button isn’t overly sensitive, but I’ve noticed that when I move to the 35-135 lens the shutter button sensitivity increases. (Not sure if this is really happening or I am imagining it, but it seems to.) In which case, I should – if only I could be arsed – change the focal button to the star button using the camera menu. I may still do this as, in moving the camera, the light-metering can change slightly, which throws everything off as I can’t change the aperture without taking my finger off the shutter button. If I used the star button, I could.
AF/ONE SHOT FOCUSING: Best for static objects.
SERVO: allows continuous focusing of moving subject – best for when subject is moving smoothly towards you. Pretty useless for a dog zooming about erratically, as I have now discovered.
AI FOCUS: Leaves it all up to the camera – avoid.
AREA OF FOCUS: I use the singular central point, or sometimes move the point using the selection dial. The diamond option – when all the focal lights are lit up in a diamond shape – is the camera taking over and choosing, as so many points are in focus. Probably useful for a big shot where I want maximum focus (a group shot, possibly?) will have to give it a go and see.
USE LIVE VIEW IF AWKWARD POSITIONING MAKES USING VIEWFINDER HARD.
LENS CHOICES
ZOOM LENSES: Typically zooms have a “sweet spot” where they are sharp but will lose quality either side of that.
15MM LENS – GOOD WIDE ANGLE
200/300MM – GOOD FOR CANDID SHOTS
Standard focal length is based on Pythagoras’ theory Or so Zig has told us, although I have to say he lost me at Pythagoras). That is to say that lenses behave differently on small sensor cameras V large sensor cameras. So a 50mm lens on my EOS 600D camera will give an equivalent focal length that is 1.5/1.6 x bigger than a full-frame or 35mm film camera, so akin to their 75mm equivalent. And vice versa. Which makes a very complicated subject seem very simple. It is not. There is serious (possibly even further) maths involved and I will have to revisit the whole concept if I am to have a hope in hell of making sense of it. But for now, there is quite a handy explanation over on bhphotovideo.com – see here. I need visuals if I am to get my head around this.
Update: I’ve since had a nose around the WWW and found this at the most excellent Digital Photo Secrets which totally helps technophobes like me get a grip on all this.
But for the meantime, what that ultimately means to me is that full frame cameras are best for portraits; studio; massive enlargements (A2 max, apparently). Conversely, my standard camera, given the right lens, is good for wildlife, sports and such. Prints can enlarge up to about A3 but not much bigger without obvious loss of quality.
Digital Medium Format Cameras (which cost upwards of £25K so I’m not likely to ever touch one) provide an almost microscopic image quality – HD essentially.
PRIME LENSES
Slightly cheaper and often lighter, prime lenses provide sharp quality but what you lose is the aperture range. They also tend to have a larger maximum aperture, so good for low light conditions or when you want a really shallow depth of field. Zig, our tutor, recommends getting a 24; 50 and 105 prime as they will pretty much cover most requirements.
There’s some interesting and easy to understand info from Nikon re lens choices and understanding focal length here.
PICTURE STYLE OPTIONS – CAMERA SUB-MENU
This relates solely to Jpegs. Keep on neutral setting as makes it as flat/normal as possible. Otherwise, you are handing over yet more control to the camera and we all know where that leads… Hell. In a handcart.
RAW – the only static, rigid info that comes with a raw file is ISO. Nothing else.
JPEG – use as back-up for RAW files. Other than that, the only point of using JEP is for continuous fast shooting (camera can’t keep up with RAW processing at speed) or when filming somewhere where you need to keep file size down as changing memory card would be a pita (underwater, for example).
POSTCODE PROJECT
Focus blog copy on the areas that must be covered in the unit.
Get used to doing recces to work out shooting angles, safety issues etc etc.
USEFUL PLACES:
RACC library has a good selection of photography books: use it.
Zig’s website has a page of links to photographic galleries – go to them – along with
online printers and photographic shops
Camera need cleaning/need new kit? Go to Fixation or Chiswick Camera Centre.
For all things flashy, try The Flash Centre.
BLOG TIPS
For note-taking on the move; use Google Keep (or mac notes).
Want to share videos? Upload to Vimeo and share link.


Leave a comment