Week 4 – Shooting on Manual
So, we’re finally here at doors to manual.
Like riding a bike, photography is clearly one of those things you can only learn by getting on and having a go. Still, in all honesty, I wasn’t expecting to have the stabilisers come off quite so quickly, so this week saw a fair amount of frantic pedalling and I came a cropper all too often. But trying to work out why I had taken a tumble was intriguing and at least I could just delete the really dodgy shots and didn’t spend the weekend picking gravel out of scabbed kneecaps.
When shooting Aperture Priority mode, there are 5 steps to consider:
- Check the ISO setting. For now I kick off on auto and see what happens.
- Compose the shot (focal length, angle, focus)
- Select the Aperture (remembering that if you are filming movement, you need a lower aperture = faster shutter speed.
- If the shutter speed is not fast enough, increase the ISO to compensate.
- Change the exposure compensation if you need a brighter or darker image.
When shooting Manual mode, there are 6 steps to consider (well, there are probably more – I’m thinking white balance for starters – but it’s only lesson 4, so bear with me):
- Check the ISO setting – see above
- Compose the shot (focal length, angle, focus)
- Select the Aperture, depending on depth of field or shutter speed (remembering that if you are filming movement, you need a lower aperture = faster shutter speed, and vice versa).
- Set the shutter speed as per the light meter – basically, use the light meter to determine the correct shutter speed (there will be some room for manoeuvre).
- If the shutter speed is not fast enough (without throwing out the light reading), increase the ISO to compensate.
- If you need a brighter or darker image, over or under expose by changing the shutter speed using the wheel.
So, really, at this early stage, the only additional bit of information to remember is that you need the correct light reading to use as the benchmark. But why do you need to do that – and how do you do it?


The camera automatically sees white and black as variants of grey, so you need to teach it how to see colours truly in the many, varying light levels that you will find yourself in. You do this by looking for a mid tone to take a light reading from – green grass, a grey pavement, a light brown dog – basically, anything that is an “average” tone, but not black, white or very brightly coloured. You are searching for a happy middle ground. Point the camera at your mid tone baseline, partially depress the shutter button and you will see the light reading scale light up. It’s exactly the same grid that I mentioned regarding exposure compensation in week 2’s blog: Depth of Field. So it looks like this:
-3, -2, -1, 0, +1, +2, +3
All you then have to do is adjust the shutter speed (using the adjustment wheel) until the light meter reading hits 0/zero. That gives you your baseline correct exposure for the current light conditions. Then, presuming the light conditions don’t change (a cloud turns up, for instance, or you go inside) when you frame your next shot you simply adjust the shutter speed so that it’s at 0 on the grid.
If having taken the shot, it’s clear the shutter speed is not fast enough, you can increase the ISO.


If you still need a lighter or darker image you can change the shutter speed to under or over expose the shot.


For every 3 clicks on the adjustment wheel, the camera moves 1 f-stop: depending on whether you are going forwards (right) or backwards (left), that either halves or doubles the amount of light that enters the camera.
For slightly darker shots, use a faster shutter speed (which lets less light in.)
For slightly lighter shots, use a slower shutter speed (which lets more light in).
THE EXPOSURE TRIANGLE
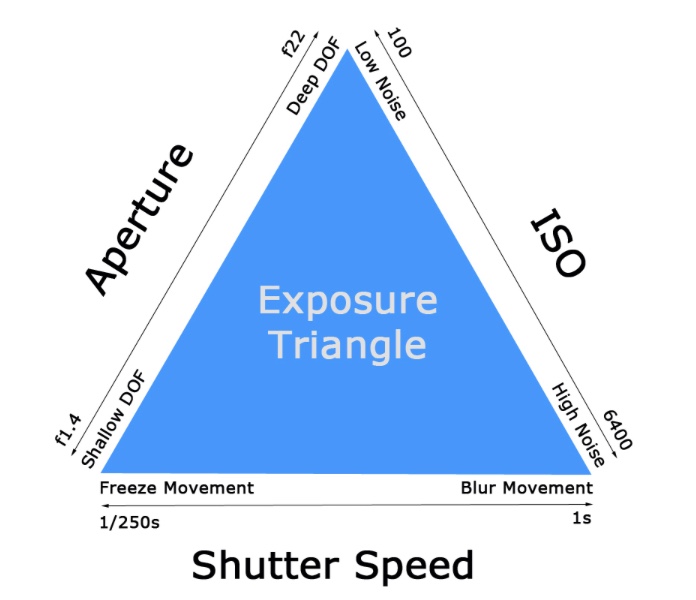
Trying to fathom out the interplay between light, aperture & shutter speed is like learning a new language and takes practice.
The Exposure Triangle demonstrates the relationship between the three. Getting the right combination is all about reciprocity and balance.
However, if you have to choose one element over the other, choose sharpness over light. You can manipulate the latter digitally in, say, PhotoShop. However, you can’t truly sharpen an image easily in post-production. So, if in doubt, use a lower ISO and look to post-production to alter exposure.


Homework this week was to play around with the shutter speed (ideally shooting landscapes with a bit of cloud, so varying light) and see how it affects images. I didn’t so much play around as try to get things right, so maybe didn’t experiment enough, although I took a load of shots. See the Manual Settings Gallery 1 for more examples. For now, though, here are a couple of outdoor settings, plus some I’ve just banged off of my notebook (boring, I know) to illustrate the effect shutter speed and ISO have on exposure.


MORE USEFUL INFO’
- Use the stabiliser for handheld shooting to minimise camera wobble. Don’t use it when using a tripod etc – as the camera won’t know it’s still and will compensate accordingly, so you will end up with wobbly shots.
- For a good settings’ baseline for static shots, look to Aperture of 8 and ISO of 100 – but you will need a tripod. So turn off the stabiliser.
- Sending large files? Use wetransfer.com for up to 2GB.
- Stock photos for blogs can be found at scx.hu; freeimages.com; stockadobe.com and shutterstock.com


Unit 1 1.1 1.5 2.3 2.4 2.5 2.6
LikeLike